


Luminar 4 Review
The most up to date and in-depth Luminar review you'll find. Discover whether Luminar 4is the Lightroom killer we've been waiting for!
Luminar | Software | Software Reviews | By Mark Condon
This Luminar 4 review is for all levels of photographer here in 2024. Whether you’re picking up a camera for the first time or a seasoned pro, you should definitely keep reading.
Verdict
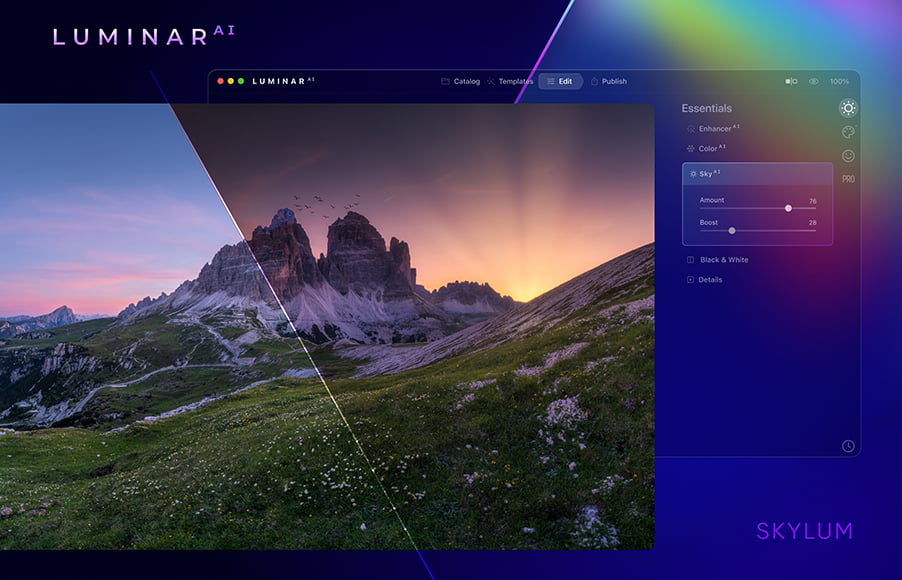
Luminar 4 is an undeniably useful, feature-rich image editing, organization and management solution with a notably modern interface, unique retouching tools unavailable elsewhere and a budget-friendly one-time price tag. Luminar 4 uses AI to produce brilliantly realistic, non-destructive edits to RAW and JPEG images on any device like Mac and PC, including portrait enhancement, one-click ‘Looks’ and AI sky replacement.
The truth is, there’s never been post-processing software available to consumers that’s quite like this…
Simple, fast, fun and affordable way to make your photos look 10x better. Zero editing experience required.
Use code shotkit10neo to save $10
Skylum has turned the photography industry on its head with the release of Luminar 4. It’s no exaggeration to say that photo editing will never be the same again.
You probably have the same questions I did:
Does Luminar 4 improve on the limitations of Luminar 3? Is it worth the upgrade? Are the Artificial Intelligence features just gimmicks? Is it a budget-friendly Lightroom alternative? Is it better to choose Luminar AI?
I’ve spent a few weeks testing out the most eagerly anticipated image editing app of the year.
Read on to take a more in-depth look at this intriguing new software…
Table of Contents
What is Luminar?
Luminar is a non-destructive image editing and photo management software for Mac & PC, designed to deliver professional results in less time than anything else currently available.
Luminar uses Artificial Intelligence (AI) powered tools to make complex editing simpler. You can let the software do all the work for you, or take full control of each edit yourself.
With this latest incarnation, Luminar 4 brings numerous feature upgrades, and can be used as a standalone image editing application OR as a plugin for Adobe Photoshop CC, Lightroom, Photoshop Elements and Apple Photos.
Luminar 4 can now be used in conjunction with industry-standard software such as Adobe Lightroom, bringing the power and convenience of the latest high-tech AI processing into an editing workspace many users will already be familiar with.
Luminar 4 is a one-off purchase (as opposed to a monthly subscription payment like the Adobe Creative Cloud), and will replace both Luminar 3 and Luminar Flex.
The cost includes ongoing feature and performance updates, as well as bug fixes and support.
Keep reading to find out more about the most recent 4.3 update, or check out our article comparing Luminar Neo vs Luminar AI if you want the latest version of the software.
New & Improved Features in Luminar 4
Many photographers reading this will have already used Luminar 3, and will simply want to know whether it’s worth upgrading to Luminar 4.In this review, I’ll start by reviewing the newest and most exciting features of Luminar 4. Then, I’ll include the existing features carried over from the previous versions, for those of you who are completely new to the software.
-
Refined Edit Module
In Luminar 4, filters are now called “tools”, and have been organised into 6 tabs with icons which run down the right hand side of the edit pane.
These include: Layers, Canvas, Essentials, Creative, Portrait and Pro.
Each tool panel appears when clicked, and disappears when the next panel is clicked – something that helps to keep the workspace uncluttered.
Here are the tools you can expect to see in each panel:
(The ability to add multiple editing layers to each image)
- Crop Tool
- Erase Tool
- Lens & Geometry
- Light
- AI Structure
- Color
- Details Enhancer
- Denoise
- Landscape Enhancer
- AI Sky Replacement
- Sunrays
- Dramatic
- Matte Look
- Mystical
- Color Styles (LUT)
- Texture Overlay
- Glow
- Film Grain
- AI Skin Enhancer
- Portrait Enhancer
- High Key
- Orton Effect
- Advanced Contrast
- Advances Gradient
- Dodge & Bur
- Color Enhancer
- Photo Filter
- Split Toning
I must admit that I think Skylum could improve the organisation – it’s not immediately obvious what’s contained in each panel before clicking it, and a search bar for tool items would be useful.
Some general interface improvements have been made over Luminar 3, including larger fonts, increased spacing between elements, increased availability of basic tools, enlarged sliders and better optimized contrast of interface elements.
These are all small tweaks that have come about following feedback from users, which is nice to know that Skylum is listening.
Unfortunately, multiple options for exporting photos are still sadly missing – the basics are there, but you’re unable to create export presets, for example. Hopefully, this will be added to a future update.
-
External Editor
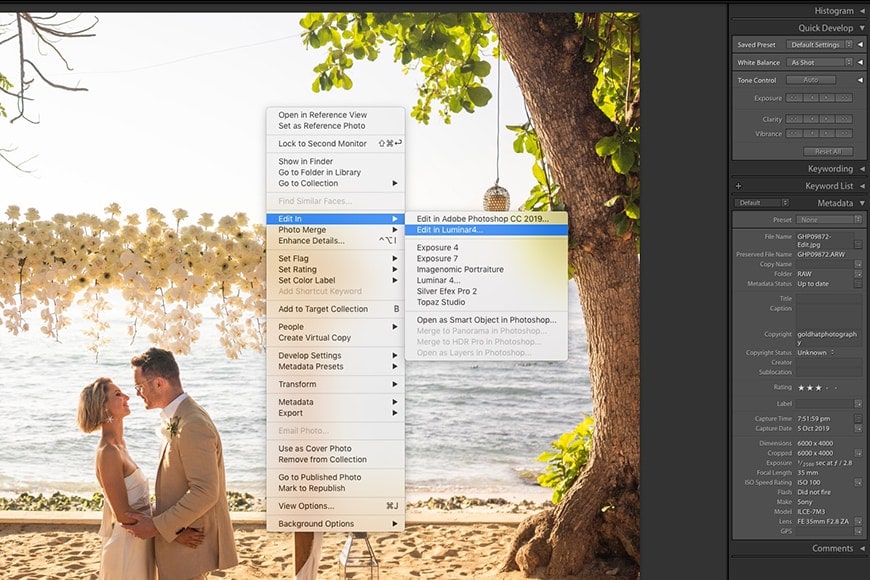
This is one of the most exciting additions to Luminar for many photographers, namely, the ability to easily open a photo in Luminar 4 direct from Lightroom (or Photoshop or Apple Photos).
Thankfully, the process is entirely seamless – from the Lightroom Library or Develop module, you simply right click an image, then select ‘Edit In > Luminar 4’.
You’re able to edit a version of your image with existing Lightroom adjustments, or without – for those more comfortable using Lightroom as their ‘base editor’, choosing ‘with Lightroom adjustments’ allows you to keep the edits.
The ability to open Lightroom files in Luminar 4 in just a couple of clicks is great for workflow.
Once the image has been opened in Luminar 4, you are free to make whatever additional edits you like, including the use of any number of the powerful AI features reviewed below, then… and this is the best bit… save the file straight back into Lightroom with the new edits.
If you’re editing direct from a Lightroom Collection, the newly Luminar-processed file is placed in your file grid right before the original, making file organisation a piece of cake. There’s absolutely no disruption to your existing Lightroom workflow.
This mutual editing functionality is a clear indicator that Skylum is positioning Luminar as a complementary product to Lightroom, rather than as a replacement.
Those users who prefer to use Luminar 4 as their sole editor can carry on doing so, but for those of us who are tethered to the Adobe workflow for whatever reason, taking advantage of the power of Luminar is simple and effecient.
-
AI Sky Replacement
This being the headline feature of Luminar 4, and according to many users, worth the price of the software alone, I was expecting to be blown away.
Did it meet my expectations? Actually, it surpassed them!
Truth be told, I secretly wanted the AI Sky Replacement tool to be a gimmick. Learning how to replace a sky believably in Photoshop takes a lot of skill and patience…
Had this sub-$100 software really just replaced a professional retoucher?!
With this Photoshop alternative, one-click changes the sky in your photo. When I say one-click, I mean it – you just select one of the bundled skies… and that’s it. (You’re also able to add your own skies.)
Luminar 4’s black magic then pretty much instantly replaces not only the sky, but matches the horizon line with pin-point accuracy... and even re-colours and re-lights the rest of the image!
Realistically replacing the sky in an image takes one click – note how the scene is also re-lit to suit the new sky.
From there, you can use all the other tools to tweak to your heart’s content to create an image that’s completely and undeniably believable. Something no one would even consider was fake.
Every time I use this tool, it leaves my jaw on the floor – it’s like seeing a photo taken at the exact same position, but at different times of the day.
The AI Sky Replacement tool is so good that it actually makes me feel a little uncomfortable using it! I feel like I’m lying to viewers, as the results are so realistic. It’s like fake news… but for photography!
If you’re a real-estate photographer, this tool is a godsend. No more waiting around until the perfect time of day to take a house facade photo, or paying costly retouchers to insert fake skies into images.
This tool is perfect for travel photographers too – imagine having only a day to get a shot of the Eiffel Tower, then turning up to a boring, lifeless sky. One click in Luminar 4, and you get that amazing sunset photo you were aiming for, along with all the Instagram Likes :-)
The most incredible thing about AI Sky Replacement is how it masks all the foreground elements so perfectly – every gap in that Eiffel Tower’s myriad rungs would show the new sky behind it…
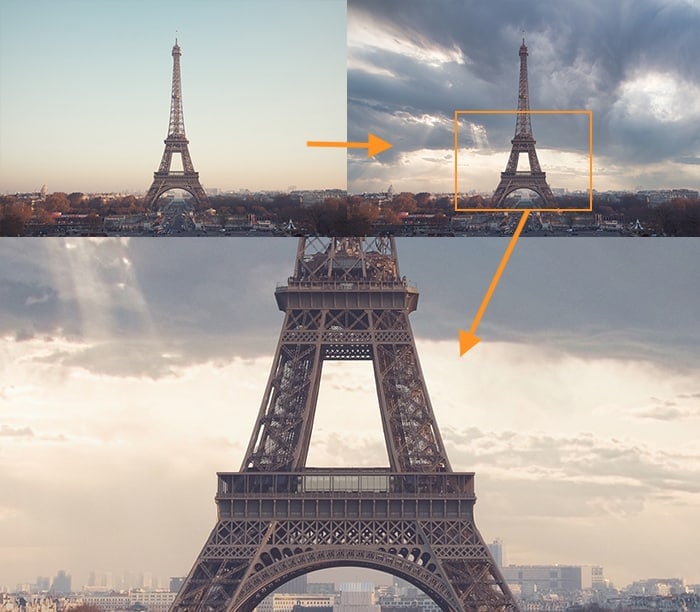
The accuracy of AI Sky Replacement is mind-blowing – this edit took 3 seconds | © Jad Limcaco.
Even for wedding photographers like myself, being able to replace a sky realistically would definitely add value to a client’s photo – just remember to choose something similar to the time of day you shot. You don’t want your clients scratching their heads trying to remember the fireball sunset, when in fact is was overcast!
Another impressive feature is the ability to sync the AI edits across several photos… with Luminar 4 adjusting each image individually – this is in contrast to Lightroom’s batch edit functionality, which ‘blindly’ adds the exact same edits to each image, regardless of its content.
Also, thanks to a ‘Relight Scene Technology’ feature in the Luminar 4.2 update, colours are now even more realistically retained from your original photo, with no unrealistic glows or casts on white objects.
In summary, Luminar 4’s Sky Replacement tool has exceeded all the hype, and is easily worth the price of the software alone.
It’s well-executed, and the type of tool that will have you re-editing all your existing photos!
-
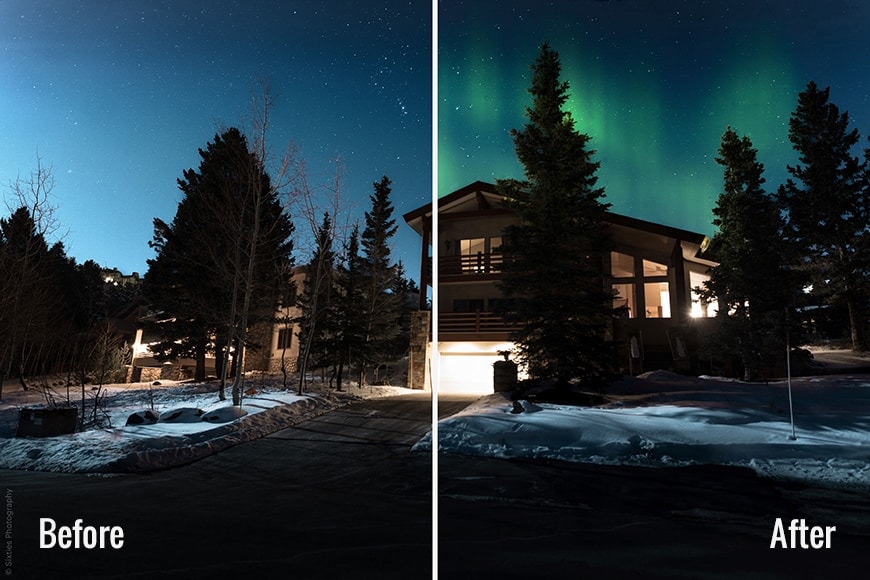
AI Augmented Sky
As part of the recent Luminar 4.2 update, Skylum provides another industry first with this powerful, if somewhat unusual, addition to their award-winning image editing software.
Residing in the Creative tab, the new AI Augmented Sky tool lets your choose various creative elements to overlay on your photos.
These include objects such as birds in flight, the aurora borealis, a full moon, clouds, a space shuttle launch (?!) and more.
You can also upload your own, and Luminar does a mighty fine job in blending them seamlessly with the photograph’s sky.
For some applications, Augmented Sky can create a realistic outcome.
Using various content-aware technologies, foreground objects are recognized and taken into account, making the object blend naturally with your existing scene.
Much like the ‘Sun Rays’ feature, you can drag the new element around the sky with it adjusting depending on its location, and still retain an element of realism.
Obviously, adding space shuttles to the background of a photo of the Shibuya crossing in Tokyo looks like something out of a Manga movie, but it’s nice to know there’s a lot of fun to be had with this tool!
“Whether you’re creating a realistic composite or creating an out-of-this-world experience, AI Augmented Sky opens up a creative powerhouse of opportunities”, says the Co-Founder of Skylum.
My favourite of the pre-installed ‘creative elements’ is definitely the aurora (northern lights), which can be added realistically to any night sky image, making something that’s definitely believable.
The birds in flight can also be used to great effect too…
While this tool may be a step too far for many photographers who prefer a minimal approach to their photo editing, it’s a free feature upgrade that can be ignored or used at your own judgement.
Luminar 4 continues to be a solid RAW image editor, and the bells and whistles such as AI Augmented Sky are a nice touch for those who want a little more creative freedom.
-
AI Skin Enhancer & Portrait Enhancer
While replacing skies in photos is something very few of us have even attempted, portrait retouching is definitely more commonplace among photographers.
The AI Skin Enhancer & Portrait Enhancer is designed to make tedious beauty retouching much easier, and much more accessible to photographers of any standard.
Even professional retouchers will use this to speed up their workflow – it’s that good.
There are numerous plugins and apps that are designed to do something similar to what Luminar 4 can accomplish with a photo of an individual’s face – thicken eyebrows, remove blemishes, smooth skin tones, sharpen eyes, relight features, etc.
However, and this is the big difference – Luminar 4 throws some AI wizardry into the mix to make the whole process incredibly fast, accurate, and above all, natural.
A regular portraiture app without AI would apply a skin smoothing filter, than require the user to mask in and out areas to achieve something realistic. With the new AI Skin Enhancer, all this is done for you… to, quite frankly, a mind-blowing extent.
(Since the most recent update, you can also take advantage of ‘Shine Removal Technology’ for those overly-lit portrait photos, and ‘Slim Face 2.0’, when you need to chisel down on the model’s face.)
It’s impressive to see how Luminar 4 attempts to to recognise the difference between freckles and skin imperfections, and deal with them both accordingly for a more natural result.
Up until now, only a human retoucher would’ve been able to do this.
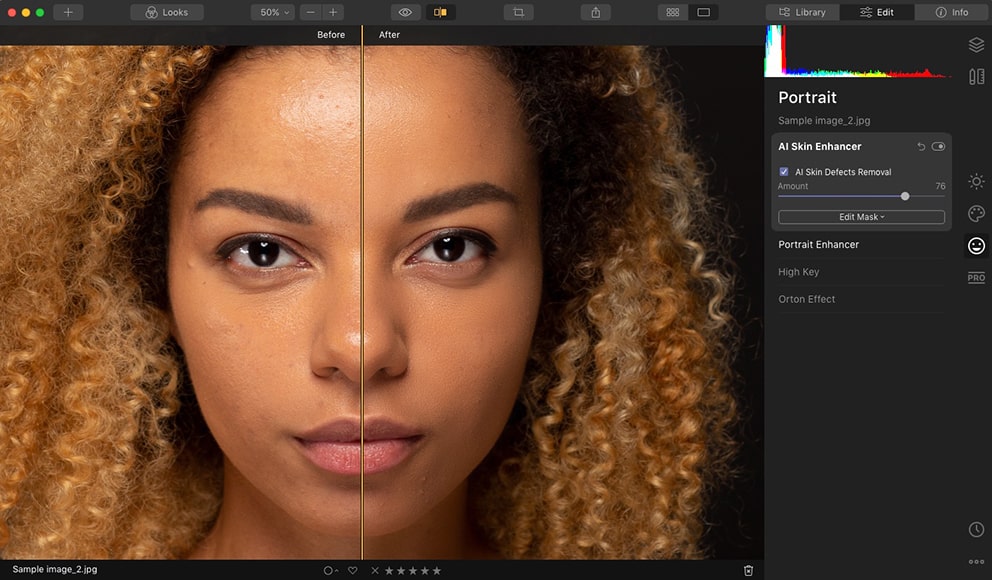
Luminar 4 favours natural-looking edits – here I boosted the default settings, but still the skin texture is retained.
Fun fact: Skylum used hundreds of thousands of photos from professional retouchers to supply the machine-learning algorithms with enough data to edit for every circumstance. Not a single stock photo was used. Mind = blown 🤯
As with all the ‘done-for-you’ AI features in Luminar 4, the user is still in complete control:.
Someone like me with little to no retouching experience can be completely satisfied with the one-click edit.
Similarly, a retoucher with more experience could then dial in their own adjustments, working on top of Luminar’s initial edits, as a ‘headstart’ to acheiveing the finalalised photo.
I can see this tool being enormously useful for anyone who needs to retouch faces, after a studio or environmental portrait session, whether the subject is male or female, and whatever their ethnicity – Luminar 4 has a realistic edit waiting for you.
-
Face Features Detection Network
Another helpful addition in the 4.2 update is something called the Face Features Detection Network – basically an intelligent face recognition tool that aids with portrait retouching.
The ‘network’ part of the name refers to an uncanny technology which is ‘trained’ to detect different faces, no matter what position, angle or tilt they might be in.
It even recognizes faces that are badly lit or partially hidden, as well as those with heavy makeup, from a variety of ethnicities, and any age.
Most impressive perhaps for wedding photographers, is Luminar’s ability to recognise all the faces in a group photograph, allowing you access to one-touch portrait enhancement.
This would enable you to, for example, adjust the brightness of just the faces of every person in a 20 person family group shot, and not affect any of the other elements of the photo – clearly a massive time saver, for anyone who’s ever attempted this with Lightroom or Photoshop.
-
AI Structure
If you’ve ever used the Clarity, Sharpen or Texture sliders in Lightroom, you’ll be already familiar with the look that AI Structure gives to photos.
However, as we’ve come to expect, Luminar 4’s AI technology takes this to the nth degree…
In a nut shell, AI Structure is a content-aware tool that detects objects that could do with some extra punch and gives it to them.
The key feature of AI Structure is that it’s ‘human-aware’, meaning that the tool won’t affect skin tones – if you’ve ever cranked up the Clarity slider in Lr and cringed at how old and wrinkly the subject in your image becomes… this tool is the solution.
In fact, AI Structure is pretty much ‘everything-aware’ – thanks to thousands of retouched images fed into its database, it recognises water, buildings, trees… and applies the edits at different levels to preserve a natural look to the photo.
‘Natural edits’ is a constant theme in Luminar 4. Sure, you’re able to go crazy and crank sliders way up there, but if you stick with the one-click solution, you’re usually 99% of the way there.
During my review, there were no halos, noise, or any other artefact that appeared due to the edit – this was especially impressive with backlit photos, where typically, halos tend to creep in around foreground elements.
Being able to add contrast and clarity to background elements without affecting the foreground subject, all in one click of the mouse button is a huge time saver, and makes me want to re-edit all my holiday photos!
These edits took just 10 seconds – one click in AI Enhance to fix the exposure, then a tweak in AI Structure.
I enjoyed taking advantage of another Luminar tool ‘AI Enhance’, to provide a quick fix to the overall exposure of my photos, then tweaking them further with AI Structure to provide some punch, as in the image above.
Anyone adept with Lightroom could try and mask out areas by adding a gradient filter to a background or a radial filter to a foreground subject, but Luminar’s tool does it all for you.
The best feature? Edits can be batch applied to multiple photos, with each edit adjusting to suit the photo in question.
Personally, adding ‘punch’ to a client’s photos is an area where I like to be in complete control, so would usually stick to making 100% manual edits.
I also found that the tool didn’t take into account the ‘depth’ of the image as much as I was hoping.
That said, it’s been great fun re-editing all my holiday and family photos with this one-click tool, which saves a ton of time, especially since I can apply batch edits in one fell swoop, with all of them adjusting depending on the contents of the photo.
-
Golden Hour
This tool is designed to bring the warmth of golden hour sunlight to your photos.
Similar to playing around with Split Toning, it affects the highlights and shadows of your image, adding in a warm orange hue.
Luminar 4 uses its content-aware technology to identify people in the image, making them look warmer than background elements, and even attempts to add golden accents to their hair.
I found this feature realistic, but it depends heavily on the time of day your photo was actually shot, since the direction and presence of harsh shadows on the ground can be a bit of a giveaway.
I also found that the ‘golden’ effect was more dependant on the colours in your existing image – going from a cold grey image straight to something you’d call ‘shot at golden hour’ required a little more tweaking.
Core Features of Luminar
These are the features that were added in previous versions of Luminar that made it such a popular and powerful editing software, long before the release of Luminar 4.
Despite being existing features, their performance has been improved to match the power of the latest iteration.
I won’t go through all of the features as there are so many, but here are some of the key features which make Luminar unique:
-
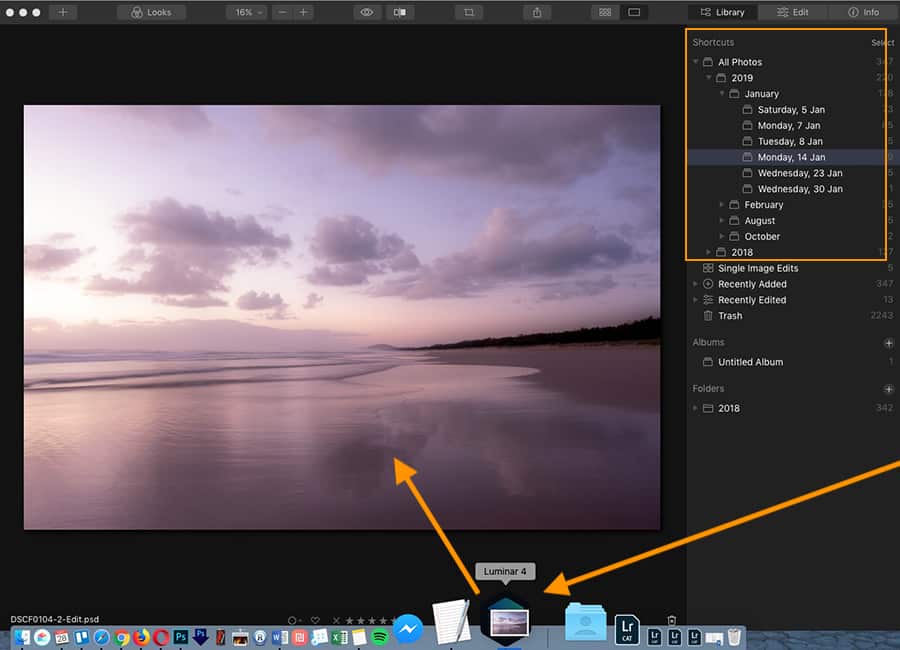
Library Module
Luminar has two primary views: the Library view for browsing and navigating your photos, and the Edit view for enhancing them. They both exist on the right-hand side of the screen, which makes navigation intuitive and fluid.
The Library side panel is most interesting for photographers who want to take advantage of image management features (DAM), most of which came with the release of ‘Luminar with Libraries’ in 2018, but has since been much streamlined.
Here you can do many of the actions that Lightroom users are used to, including flagging images as favourites, and rating, etc.
Switching between the Library and Edit modules is instantaneous – something that definitely can’t be said for Lightroom, which tends to lag most when switching between modules.
Switching between Library & Edit modules in Luminr and adding ratings is quick and simple.
When you activate Luminar 4, the library scans your hard drive and updates itself to match the exact hierarchy of your hard drive.
This can take some time depending on the size of your drive and the number of photos stored, but only needs to be performed once.
Luminar’s file management system is much more intuitive than that of Lightroom, which only displays folders that have had their contents manually imported – a source of much confusion for beginners.
The process of being able to drag and drop an image onto the Luminar application icon, and have it load up ready for immediate editing is great for workflow – this is in contrast to the clunky import process of Lightroom, which forces its own folder hierarchy on you.
While many users reported crashes at the import stage in previous versions of Luminar, I didn’t have any such problems with V4.
There’s also a virtual organization system called ‘Albums’, that allows you to organize your images into groups without changing where your files sit on your hard drive.
This is a really neat feature, particularly if you have your images all over the place on your computer, and provides the best of both worlds – mirrored and virtual file management.
Here are the 3 main ways to organise and access your images via the new Luminar library:
1. Shortcuts
You can quickly access your library with a series of convenient shortcuts, including All Photos, Quick Edits, Favorites, Recently Added, Recently Edited, On This Day, Lost Edits, and Trash.
I particularly like the inclusion of ‘Recently Edited’, which allows you to quickly return to the last images you were working on – a big time saver.
The titles that aren’t perhaps self-explanatory are ‘Quick Edits’, which contains all images that were opened as single files (instead of being added within a folder), and ‘Lost Edits’, which appear when you have files that were moved and need to be reconnected.
2. Folders
If you’re used to working with folders, start here. It’s all pretty straightforward: add folders containing your images, and any changes you make to your folders (on your hard drive) will be reflected within Luminar.
This is great if you don’t want to keep two different structures in your head, since you may not always be in an editing program when you’re rearranging with your images.
Any new images that appear in your hard drive folders are automatically added to your Luminar Folders, so you really don’t have to import anything that you’re not bringing from outside.
When editing images in Photoshop (without going through Lightroom), you’d normally have to re-import the PSD to Lightroom later. However, with Luminar constantly scanning your folders for new images, this can all happen automatically… which is great for your workflow.
If you outgrow the drive you’re working on or you need to move your photos to a new machine, Luminar makes the process simple – just move the folder with Luminar closed, restart Luminar, and then choose the Find Folder option to find everything automatically.
3. Albums
If you’d rather not affect the organization on your hard drive, you can organize your images inside Luminar using albums – sort of like how playlists organise your music.
You can create an album based on who took the photos, where they were taken, what project they were taken for, etc… all while leaving your hard drive untouched.
Like a Lightroom Collection, if you delete a photo from an album, the actual photo remains untouched – it’s only the album that changes.
-
Luminar Looks
Luminar comes with several “Looks” (i.e. presets) for one-click adjustments. It also allows you to download new presets, share them, or even create your own – much like a Lightroom preset.
At the time of writing, you can get a bonus pack of ‘Inspiration Looks’ for free when purchasing Luminar 4 – check here to see if they’re still available.
If you don’t like the distraction of Looks sitting at the bottom of your main editing window, you can turn off the Luminar Looks filmstrip.
I found that turning them off provided a slight performance boost to Luminar too.
The ability to adjust the strength of each Look is unique to Luminar.
For any photographer short of time who just needs a one-click solution for their dull RAW images, the Looks can be a fun and useful feature.
Being able to quickly toggle the ‘strength’ of each Look is unique to Luminar too – Lightroom doesn’t offer the ability to do something similar with Presets, at lest not without a 3rd party plugin.
In practice, I found using Looks to be a little ‘laggy’ – as you can see in the image above, there’s a slight delay when adjusting the strength.
(For reference, the file was a 24.8MB RAW, and my computer is a 2015 Macbook Pro i7 with 16GB RAM. I was running a CPU intensive screen recording software at the same time, so this could have contributed to the lack of snappiness.
-
Layered Editing
This handy feature allows you to stack your image edits in adjustment layers, allowing you to make edits to each individual layer, without affecting those above or below.
Similar to ON1 Photo RAW and a few other editing apps out there, layers bring the core feature of Photoshop to Luminar, and adds fine-control for users who want to get more hands-on with their editing.
You may also want to check out my review of Luminar Neo, which also offers layer-based editing.
-
Advanced Masking
Everything that Lightroom offers is baked right into Luminar, including the ability to mask with brushes, radials, gradients and even luminosity.
Luminosity masking is especially useful for landscape photographers who wish to mask their images based on brightness, for example, allowing you to make sky selections quickly… although, with AI Sky Replace, it’s arguable as to whether this will even be needed!
-
LUT Mapping
While color grading with Look Up Tables (LUTs) isn’t a well-known technique, for those who like to use it, it’s hard to go without.
I’ve only been playing around with them since Luminar 2018 came out, and I have to say, I love the effects of some of the free LUTs.
You can even convert custom Lightroom presets into LUTs and load them into Luminar. Definitely a power-user feature, but nice to know it’s possible.
-
Sunrays
This was the feature that made many photographers purchase Luminar 3, and it’s just as impressive here in Luminar 4.
As its name implies, Sunrays allows you to add the sun and its rays into your photo, all the while customizing every aspect of it: length and number of sunrays, penetration, sun radius and sun warmth.
What makes it particularly unique though, is that the Sunrays filter senses the dark and light parts of your photo and adjusts accordingly, placing the sun behind objects and allowing the rays to shine out around them.
Note how the sunrays adjust depending on the foreground element… no matter how complex. (Image quality reduced for Web.)
That last sentence deserves repeating – this tool places the sun behind objects. Luminar’s black-magic AI strikes again….! 🤯
Photos are inanimate and two-dimensional – how on earth can a software calculate what objects in a 2D photo are in the foreground and the background… and make realistic adustments on the fly?!
This is another one of those tools that will leave your jaw on the floor each and every time you use it.
Anyone who’s ever tried to recreate the effect of sun rays in Photoshop will appreciate just what an enormous time-saver this tool can be.
-
Batch Processing
This Luminar feature (which has always been a core feature of Lightroom), allows you to save considerable time by applying the same develop settings to multiple photos.
Simply edit one image, then switch to the Grid view (‘G’), select all images shot in similar conditions, then right-click and choose Adjustments > Sync Adjustments, or press Shift + Command/Ctrl + S.
This is particularly helpful to those who should events, weddings, sports and other types of photography where a lot of images are shot in similar (lighting) conditions.
The versatile Batch Processing feature of Luminar 4 contains many options that you can conveniently apply to a large set of images.
-
Dodge and Burn
There are lots of ways to dodge and burn in Photoshop, but none of them are as quick and easy as Luminar’s excellent Dodge and Burn tool.
All you have to do is paint over the area you want to dodge (lighten) or burn (darken), then adjust the amount.
If you’re a fan of this old school technique and like a quick workflow, you’ll be hard-pressed to find a better way to go about it.
I also particularly like how the nomenclature is ‘lighten’ and ‘darken’ when using the tool – perfect for beginners.
-
The Orton Effect
Made popular by The Lord of the Rings movies, the Orton effect blurs some areas of an image while keeping others in focus to give an other-worldly effect
It took me a while to see its appeal, but I’m now a fan of it and find it fun to use a small element of it in some of my landscape work to ‘soften’ any existing edits.
I do find it a bit odd, however, that this tool is found under the ‘Portrait’ tab.
-
Adjustable Gradient
The Adjustable Gradient (aka Top and Bottom Lighting) filter allows you to adjust the exposure for each separately – priceless if you only have single exposures from a shoot, or neglected to use a camera filter.
It’s quicker and easier than the many other ways of getting the same effect, and can be fine tuned when you need more control.
You can see in the video above how the adjustable gradient is applied well automatically by Luminar, when it recognises the horizon line in my image – when the video loads, it’ll show the appropriate section of the review.
-
Landscape Enhancer
Skylum has chosen to label many of its tools based on the effect that they give, rather than hiding them under technical terms – a good example of this is with the excellent Landscape Enhancer tool menu.
Instead of having to tweak multiple texture, clarity or sharpening settings or use complicated masks, you’ll find things like ‘Dehaze’, ‘Golden Hour’, and ‘Foliage Enhancer’, making adjustments obvious before you’ve even made them.
If you want to fine tune Luminar’s edits, there’s always the option of manually editing the mask, but in practice, the AI does a great job of getting it right the majority of the time.
Luminar 4 Speed & Performance
One issue that’s been improved since Luminar 3 but not completely resolved, is that Luminar 4 requires a lot of processing power.
To keep things realistic to the average user, I chose to test my copy of Luminar 4 on an older model (2015) 13″ Macbook Pro 3.1 GHz i7 with 16GB RAM, and found things a little slow, especially when using the CPU intensive Looks.
By comparison, Lightroom Classic is no speed demon either, but certainly still felt a bit snappier.
When switching to a 2017 13″ Macbook Pro 2.4 GHz Core i5, both Lightroom and Luminar 4 functioned much better – make of that what you will.
According to Skylum, the recommended tech requirements of Luminar 4 are as follows:
Windows:
- Intel® Core™ i7 7th generation or better, AMD Ryzen™ 7 2nd generation or better
- Discrete GPU with 4GB+ of RAM
- 16+ GB of RAM
- SSD as primary drive
- Calibrated monitor with at least 1920×1200 resolution
Mac:
- Intel® Core™ i7 CPU with 4+ cores or better
- 16+ GB of RAM
- Discrete GPU with 4GB+ of RAM
- SSD as primary drive
One thing’s for sure – despite the massive influx of capital since Adobe’s introduction of its Creative Cloud subscription plan, Adobe still hasn’t really been able to make Lightroom faster.
Skylum on the other hand has a clearly defined road map of updates, and a history of listening to its users and making numerous feature updates and fixes throughout the year… all free of charge, and included in the one-off fee to purchase Luminar 4.
Since Luminar 4 has been built from the ground up (rather than the multiple band-aid solutions applied to an already ageing Lightroom), we can assume that the main hindrance in performance to be the actual computer you are using.
You can also check below in the ‘Updates’ section for speed/stability improvements Skylum released with the latest version of Luminar 4.3.
Luminar vs Lightroom

Is it even necessary to compare Luminar vs Lightroom anymore?
With the release of Luminar 4 and its ability to be used as a plugin to Adobe and Apple editing software, it’s apparent that Skylum intends for Luminar to be used in conjunction with Lightroom – not as a replacement.
I can see many Lightroom users choosing to purchase Luminar 4 to use alongside their main workhorse image editor – this is the scenario I have chosen, with both apps installed on my computer, working in unison.
Photographers who are used to Lightroom editing and file management can perform the main bulk of their work within Lr, then with a quick ‘Edit in Luminar 4’ menu command, take advantage of Luminar’s powerful AI tools to finish off the image.
Those who aren’t existing Lightroom users, or perhaps have had enough of the Adobe Creative Cloud subscription model, may choose to use Luminar 4 as their sole editing application.
Luminar 4 includes pretty much every editing tool that exists in Lightroom Classic and adds on several AI-powered tools that create edits that are simply impossible in Lr.
As for metadata (captions, keywords, etc), that’s coming along in a 2021 update, so anyone who relies heavily on keywording will need to stick with Lightroom for now.
Despite having Digital Asset Management (DAM) capabilities built into the Luminar Library, cataloguing images is still Lightroom’s forte.
That said, many photographers will still prefer Luminar’s intuitive approach to mirroring the computer’s existing folder hierarchy.
(After all, it’s rather confusing every time Lightroom asks you whether you want to Copy, Move or Add a file.)
It’s intuitive and refreshing to start editing an image just by dragging it onto the Luminar app icon, and have the Library folder hierarchy mirror the change.
However, many users ingrained in the Lightroom workflow may still prefer it for organising and managing huge libraries of files.
The use of Smart Previews in Lightroom, for example, allows much faster handling of large quantities of files, not to mention the ability to work remotely on your photos, even when away from your main hard drive.
The mobile/tablet editing functionality of Lightroom CC is another big advantage of Lightroom over Luminar, (and over most other image editing software in 2024), but it’s not important for every photographer.
One small file management issue we found while testing Luminar 4 was when opening an image via external editing.
In Lightroom, when you open an image via an external editor like Photoshop, you can perform the edits, then save the completed file in the same location as the pre-edited version. It’ll also appear adjacent to the pre-edit in the Lightroom film strip.
With Luminar on the other hand, when using third-party plugins like Aurora HDR, the edited images don’t appear next to the image(s) that were exported – you have to manually choose where to put them, and that means remembering the exact folder you took them from, which can be annoying.
Now it’s time to tackle the elephant in the room – the difference between Lightroom and Luminar’s pricing.
Price really is Luminar’s big drawcard over Lightroom. For those of us deciding on just one image-editing application to edit and manage all our precious memories, Luminar 4 is definitely the best financial choice – the one-time fee is a steal for all it offers.
Luminar has no subscription fee and an affordable price tag, and is currently on sale here, (with a bonus 1 year SmugMug subscription to boot).
All updates, including new features and bug fixes throughout 2024 will be free, until, I’m assuming, there’s a version 5.
Adobe, on the other hand, will never get rid of its subscription model, and choosing to halt your Creative Cloud plan mid-subscription renders Lightroom largely useless – you’re basically locked into making payments forever.
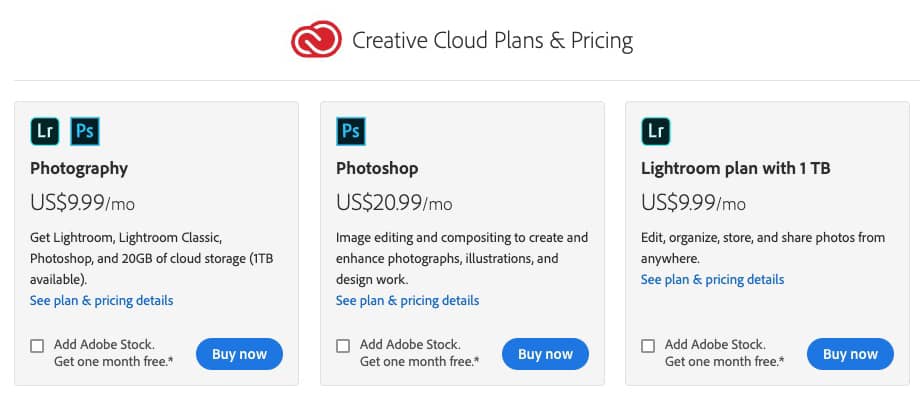
You need to pay each month for a Creative Cloud subscription to use Adobe Lightroom.
For some professionals (myself included), paying each month to use Lightroom is a necessary evil…
However, thanks to the low price of Luminar 4, we can afford to pay for both apps, and use them in unison, which is precisely what I’m doing.
I didn’t want to break it down to cost alone, but the accessible price point of Luminar 4 is a key reason for users to choose Luminar over Lightroom, if you’re trying to decide one over the other.
If you still don’t see the benefit, see this article for a range of Luminar alternative apps.
How much does Luminar 4 Cost?
Whichever way you look at it, the current Luminar 4 price is very reasonable:
New Luminar 4 customers: $89/€89/£81
Upgrade from Luminar 3: $69/€69/£64
(Included in the price is a bonus pack of ‘Inspiration Looks’, worth around $50.)
Although not heavily publicised, Skylum offers a 30-day money back guarantee.
This means that you can experiment with Luminar 4 on your own photos for almost a month, before deciding whether you want to keep it forever.
Remember to use code SHOTKIT15 to save $15.
Luminar 4.3 Update Details
The June 2020 4.3 update focused on a powerful new and improved Search tool, significant performance improvements (including faster opening of RAW images and more responsive sliders), AI Augmented Sky improvements and 500px sharing.
Here’s a summary of the June 2020 4.3 update:
- Better Looks experience. Instant Looks previews right on the canvas (when hovering the mouse over a Look) let you browse and choose Looks faster and easier.
- Custom skies. In the AI Sky Replacement and AI Augmented Sky tools you can now access folders with your locally stored skies. You can copy and paste multiple skies or sky objects from a folder in just a few clicks for faster editing.
- Camera support. Canon EOS-1D X Mark III (uncompressed only), Fujifilm X100V, Fujifilm X-T200, Fujifilm X-T4, Leica SL2, Nikon Coolpix P950, Nikon D780, Nikon Z50, Olympus E-M1 Mark III, Olympus E-PL10, Panasonic DC-S1H, and Sony A9 II.
- Optimized Crop workflow and fast access. Crop & Rotate is now located in the right panel underneath Lens & Geometry and looks the same as other tools.
- New masking brush workflow. The masking tool is now extremely easy to use: masked areas are visible mid-process thanks to a transparent red mask.
- Reset Adjustments button. Return to the unedited state of a photograph using a Reset Adjustments button located in the top panel above the Looks.
- Improved localization. Improved translations for all supported languages.
- Better Magic Mouse workflow for Mac users. The swipe function works only in Library mode. Use the left and right arrows on the touchpad when in Edit mode.
- Local Brush history for Windows users. Undo one brush stroke at a time and not all of your work.
Read more about all the updates here.
How to Update Luminar
- Mac – Launch Luminar 4 > Top Menu Bar > Luminar 4 > Check for updates.
- Windows – Launch Luminar 4 > Top Menu Bar > Help > Check for updates.
If you’re using Luminar as a plugin for Photoshop, Lightroom Classic, or Photoshop Elements, you’ll need to rerun the plugin installer to get the latest updates.
Frequently Asked Questions
What is Skylum Luminar?
Skylum Luminar is a powerful yet affordable image editing software for Windows and Mac. It features professional-grade features accessible to photographers of all levels.
Does Luminar 4 replace Luminar 3?
Yes – Luminar 4 is a newer version of Luminar 3. Luminar 3 was an update of the original Luminar 2018 software.
Does Luminar process RAW files?
Yes – Luminar processes both RAW and JPEG files.
Can Luminar replace Lightroom?
Yes it can, and many photographers actually prefer Luminar over Lightroom for several reasons, including ease of use, the presence of specialist editing features, and most notably, the absence of a monthly subscription fee.
What is the difference between Luminar and Aurora?
Luminar is designed as an all-round image editor, whereas Aurora is designed to be an HDR image editing software. Both are produced by Skylum.
Is Luminar non-destructive?
Yes – it is a non destructive RAW image editing software.
Is Luminar better than Photoshop?
While some of their features do overlap, Skylum Luminar and Adobe Photoshop are dissimilar in many ways. One is not ‘better’ than the other – they are meant for different usages.
Luminar 4 Review | Conclusion

The one-click editing power of the new Luminar is truly impressive.
I’ve had mixed feeling writing this Luminar 4 review.
On the one hand, I really didn’t want to like it. Using Artificial Intelligence to edit my photos felt in some way… like cheating!
Adding in skies that didn’t exist in my original images… turning overcast days into golden hour… removing blemishes from skin with one-click… it all felt too easy.
After all, these are image editing skills that take years to master, and hours to execute… and even then, are arguably less convincing than when using Luminar’s AI tools!
Let’s face it: we’re losing to the robots! After giving in to my initial prejudices, I remembered that this kind of image retouching has been happening for years. It’s just never been this easy or accessible.
Skylum has ingeniously covered all bases with Luminar 4. Photographers have been given every editing tool that exists in popular apps like Lightroom, as well as enough image management features to keep most photographers happy.
For those of us entrenched in Adobe Lightroom or Apple Photos, we have the ability to keep using our favourite software, and use Luminar 4 in conjunction – taking the best of both worlds.
Missing features and niggling performance issues aside, we can be confident in Skylum’s historical commitment of continuous improvement.
Luminar 4 may be the latest and the greatest in the series, but it’s still a ‘V1’, according to CEO Alex Tsepko. (I’ll be updating this review as and when new features and improvements are rolled out.)
For now, my advice is to take advantage of the generous 30-day money-back guarantee and download a copy of Luminar 4 to test out on your computer with your own photos.
As long as your computer meets the minimum requirements, I’m confident that you’ll enjoy Luminar 4 and find image editing a much more exciting task than ever before.
Whether used in conjunction with or as a replacement for Lightroom, Luminar is an incredibly powerful piece of software that’s simple to use and best of all, priced within the reach of all photographers.
Simple, fast, fun and affordable way to make your photos look 10x better. Zero editing experience required.
Use code shotkit10neo to save $10
 Luminar Neo Review (My Latest 2024 Test Results)
 Luminar Neo vs Luminar AI: 6 Key Differences to Know in 2024
 Luminar AI Review – Can Artificial Intelligence help you Edit your Photos?
 Luminar vs Lightroom for Photo Editing (7 Key Differences)
 Luminar Flex Review

Mark Condon is a British wedding photographer and editor of Shotkit. When he’s not taking photos or reviewing the latest camera gear and software, Mark can be found cycling around the northern rivers.
103 Comments
Leave a Comment
WELCOME TO SHOTKIT
Enter your email to be sent
today's Welcome Gift:
19 Photography Tools
🔥 Popular NOW:

Shotkit may earn a commission on affiliate links. Learn more.
The software and online service generally provide a user-friendly interface, making it easy for users to navigate and download YouTube content without much technical knowledge or expertise.
This feature can be useful for offline viewing or archiving purposes. This feature can save time and effort when downloading multiple files at once.
The software works great. I’ve been using Luminar since it first came out. HOWEVER, and this is a huge HOWEVER. The scroll bars are ridiculously small. If you read the forums, artists and photographers have now going on for over a year been complaining about how difficult they are to use.
Download the trial first. Focus on the scroll bars. See if you like their width. I hate them. Can’t stand them. They are the biggest pain.
I’m new to this game, so forgive my ignorance, but the “no export” bit bothers me. Does that mean I get my photo the way I want it and can’t email it to my photo printer? (I don’t have a color printer and send everything to a professional print shop I trust)
Hey Lenora, sorry – I just clarified my comment on the exporting functionality. You can definitely print your photos from Luminar and export them to your computer for other uses too.
Can you use itunes and create slide shows with the beautiful editing you have done with Luminar 4?
There’s no slide show feature unfortunately, Deb.
I have a Dell laptop and an iPad Pro with Lightroom. Will
Luminar 4 run on an iPad Pro, and do I have to purchase 2 licenses?
There’s no iPad app, Charlotte – I’d recommend Lightroom if you need that.
Hi People,
I used the trial version and finally bought the Luminar 4.
The software is ok, and just “Ok”.
It does cool things very well, like the AI Sky replacement and some adjustment tools. Still, when looking for a serious contender for Lightroom or PhotoRaw, it terribly lacks one functionality: sync “Crop” among pictures.
I usually take my shots using the highest resolution and all the frame, but I always crop my pictures to 16×9 ratio. When using competitors’ products, I always start cropping one of my photographs and sync the crop to all the others. This is a very basic, “Must Have”, feature that any software with this purpose should have. Guess what: Luminar 4 doesn’t have it. Yes, you’ll have to go on each of your 1000 pictures and crop each one. Each one…
Another annoyance is the slowness. The sync process is unbearably slow.
I hoped I had explored the trial better. Although the Sky replacement is cool, I wouldn’t pay for only this.
Can you please give your opinion on Luminar 4 vs ON1 Photo RAW 2020.5?
We’re actually about to release an update to our ON1 review, Anatolly – hopefully that will help you decide.
Hi, sorry if the question seems out of place. I have an I-mac and a Macbook pro. I’m trying to find a way of having access to my Photo library which is on my i-mac through a cloud storage or app when I’m travelling, without having an automatic synchronising because I have close to 100 000 photos and my laptop doesn’t have that kind of storage, Would using Luminar help me with this issue ? Thank you
Hey Bernadette – you may want to look in to the cloud syncing features of Lightroom instead.
Been using luminar 4 for a while ,one problem cant make borderless prints as ye
Can anyone tell me if there is the same problem with Fuji raw files as is in Lightroom (worms), Thanks.
Does it have noise reduction option, please?
Yep – it’s called the Denoise filter.
1) You said it has no OPTIONS for exporting photos. Does this mean you cannot export the photos in any way at all? That would make it almost useless to me…
2) Also, are you able to use the edited photos for commercial use for sale of your photos after editing in the software with all the new sky, lights, rockets, etc. effects, by just purchasing the software? Or is there some additional license you may buy for this option?
1) Yes; 2) Yes! (i.e. There are NO additional licenses needed.)
I am interested in when Keywording would be included in L4 or later?
I am considering a jump as am not impressed with LR lately and changes to my Photo files metadata particularly in terms of File name and also Captured dates which should be sacrosanct.
This happens from inside LR (subscription up for renewal about now, and yes I object to the subscription model too. So watch out Adobe, I may jump ship this year).
Apple and Adobe both need to realise we the customer are just that and not treat us with contempt based on our OS platform choice as the seemely they both do (see the comments and feedback about the issue noted above on Adobe community).
So I’m glad that L4 is non-destructive to Raw metadata, but what no review seemed mention what L4 may or may not do to non-RAW images metadata. Important for my early images and DSLR and scan images.
Keywording is on the roadmap according to Skylum, Steve, but I’m not sure when exactly they plan to release the next update. Fingers crossed ;-)
I like to print and share my best photos with my friends. Question: Does Luminar 4 have a printing module similar to Lightroom? How Does Luminar 4 handle printing? Thank you!
Although you can print easily from Luminar, Jack, Lightroom has far more options.
Thanks for the review. I’ll soon be migrating to an iMac with Retina display and will not be able to use Aperture anymore :-( Your discussion caused me to re-think “Why do I edit?” Its about the image, not the process. My default edit is to make it look like I remember it, whilst sometimes getting more creative.
The integral DAM feature is also nice as it relieves the need to manage multiple libraries.
Lastly, researching and comparing photo editing applications one review at a time is a drag. Somewhere there must be a matrix for comparing features and ratings side-by-side.
The Lr plugin architecture has been there for years, Nik and Topaz have always used it so it is nothing spectacular so far as Luminar is concerned. You make no mention of the integration with Ps Smart Objects that I could find and that is one of the good points. As for the DAM/Library – what DAM? It is a sub standard file browser with no search, smart albums, sort, keywords etc. It comes nowhere close to Lr, C1 and the like. How can you say masking is advanced when there is no edge aware technology or colour range – Lr and others leave it standing.
Finally I cannot see you mentioned that Luminar supports plugins, which is a great development.
Thanks for the feedback! Will definitely look at updating the review with your suggestions. As for the Library, I find it adequate for the average photographer, but agree that it’s nowhere near other applications….yet.
I enjoyed your review of Luminar 4. Thanks for the details. I’m relatively inexperienced in post processing, but I have been using Capture One for less than a year, and I like it. Does Luminar 4 work with Capture One?
You’re not able to export files directly from Capture One into Luminar (like you can with Lightroom), Edmund, but you can definitely use it in conjunction – i.e. editing an image in Capture One, exporting it, then opening it in L4. Does that help?
Downloaded the trial and for the most part was impressed. I did one thing that was a pretty big deal that I didn’t like at all, along with another little annoyance.
The annoyance is that when installing L4 detects your Photoshop installation, but it does not detect Affinity Photo. Since I am moving away from Adobe products – which is why I now have Affinity Photo and am trying out L4 – it would be nice for the software to integrate with AP like it does with PS.
A bigger deal that I discovered was that while using the Clone tool, for example to brush up a portrait, Undo is disabled! You could literally spend 10 minutes touching up a photo, hit one bad spot, and have to undo the entire range of changes since you cannot undo just one. That is a MAJOR oversight!
Unfortunately the deal breaker for me was the fact that L4 limits you to 2 installations. Every other piece of software that I use has a bare minimum of 3, and that is how I have set up my workflow.
Being limited to 2 installations is extremely restrictive and is not something that I can or am willing to change. Sure, you can add an additional seat to your L4 license – at nearly half the price of the software itself!
It’s a shame but that is a bad misfire on Skylum’s part.
Thanks for the feedback, Bob. For what it’s worth, Adobe Lightroom only allows 2 installations too. I guess the more the better, though, right?! Let’s hope Skylum addresses the Undo feature for the clone tool too.
Based on your fantastic review, I have tried the trial and have now bought it, saving £10 with your code :-)
That’s excellent news, Paul – thanks so much! Let me know how you like it!
I like your review , but until Luminar 4 includes the ability to create virtual copies it will forever remain a good plug-in, but never a stand alone RAW processor and we will be forced to look elsewhere. Pity.
Fair enough, Nick – sounds like virtual copies are important to you! I can say with all honesty that I used virtual copies in Lightroom less than 3 times last year, after editing over 40,000 images! Everyone’s editing process is different after all.
Enjoyed reading your review – was helpful, thanks for your work on it.
Just bought a new MacBook Pro 16″ with 64 gb of RAM and this app works great for me as you’d expect – not slow at all. My primary editor I’ve used for years Nikon Capture NX which I will still use – but really enjoying some of the features so will work on learning this software more as it has some great features.
Ah very nice, Michael! I bought that Macbook too for testing and it made L4 absolutely fly! Enjoy ;-)
If you are a Windows user Luminar has not yet included an ‘undo’ function in the Clone & Stamp and Erase Tool’s.
If you make a correction and don’t like it you need to close the tool, go back in history to the previous edit and then reopen the tool.
This is a cumbersome, time consuming task. I love many features of Luminar but this is a big obstacle they need to correct.
I posted this information on their support page soon after ver 4 was released, but they have still not addressed in their latest update.
Hopefully they come to it soon, Bill! Glad to hear you’re liking Luminar!
Hi, does Luminar 4 have the equivalent of Lightroom’s Transform tool? I need to be able to auto correct perspective and then manually tweak if required.
Is this what you mean, Chris? This guide is for L2018, but should apply to v4 too: https://skylum.com/luminar/user-manual/2018/mac/crop-transform-a-photo
I like what I have seen in L4. However, the fact Skylum still has not given attention to giving a photographer the ability to easily add a watermark or signature stamp to a photo as part of the export process is absolutely silly. When I post my photos online I want to be able to put my brand on them – it’s an important part of the promotional process as far as I’m concerned. It’s part of growing one’s presence online. The failure to provide this feature will keep me from going all-in with Luminar for the foreseeable future.
L3 needed only 8gb of RAM snd is running fine on my MacBook Pro. However, I see than L4 needs 16gb of RAM. My machine memory is not upgradeable. So, the question is will L4 run on 8gb of memory, just more slowly? I am impressed with the new features, but at this time cannot upgrade the machine.
Thanks
Some of the features may run slower, depending on how many other apps you have open at the same time, Cydney. I’d recommend taking advantage of Skylum’s money back guarantee and ‘trialing’ the software on your computer. Let us know how you go!
Hi Mark
Thanks so much for this review
I have both L3 and 4 as well as Adobe CC Lr classic
I’m finding it confusing importing images into Luminar – does Luminar automatically import your images? If so, are you able to select the ones to import as Lr does?
I have tried to find a more detailed info on importing with L3/4 but no luck
Thank you
Derry
Hey Derry, does this help? https://skylum.com/luminar/user-guides/chapter-8-importing-images-macos
Is a solid state drive required for Luminar 4/
No it isn’t Eric, but as with anything that requires files to be read off a drive, the faster the drive the better, and that inevitably means solid state it better than spinning.
This is what I call a comprehensive review! And yes, we may not loose against the “robots” if we stay in good terms with them, allowing them their rights to exist without pre-justice. As I begun many years back using PS 2.0 later even dragging myself into LR due to archiving hurdles caused by digital cameras and the resulting increase of every larger memories cards, I tried PhaseOne / CaptureOne but this Lumiar looks like it is worth when traveling as a single editor. I think we are really in the post-photoshop times.
Hey! Thanks for the review, I checked L4 a couple of months ago but figured it doesn’t have the image management tools as I thought it’s only a plugin. I know better after your review and will definitively check it out. I mean I’m missing the smart previews of LR but I used to travel with my external photo storage for years so it’s not that big of a deal and I’m positive it’ll come in the future. If there is everything that LR offers I’d readily give up Photoshop and Lightroom as well as Adobe Portfolio and the other extra services and look for another solution on that front. Don’t get me wrong, I love Lightroom, it was the first software that really worked and made things a lot easier for all of us and I also get why Adobe and other Devs do subscriptions Models and that’s totally fine from a business/developer point of view. I’m just not trusting Adobe enough to keep the prices as they are and I don’t want to be a slave to their pricing models.
I use Photoshop CS6 and Lightroom 6 and I am very happy with both. But I feel that Luminar 4 would enhance my creativity and add variety to the outputs. Aurora HDR also sounds interesting – is that a good program with great results and worth adding (MAX Edition)? I am not very experienced with HDR. I am using Windows 8.1 – will it work ok there? Thanks!
Hey Jirka, do a quick search using the seach bar above for ‘Aurora Review’ – that should help you.
I am thinking about buying L4 but I have a question to witch I cannot find an answer.
In L3, there were two modules (Background Replace and the mobule that allows conversion to a B&W image and then painting in the color on only certain parts of the image).
Have these been removed from L3 with the release of L4?
Also, from what I can tell, the trial version has crippled the export of the L4 edited version. I could import an image from Mac Photos but there is no DONE button in the Trial and therefore the image never goes back to the Apple Photos Library.
No problem with their decision to cripple the trial, but it might be a good idea to actually tell users expecting the full L4 experience.
Hello, let me address your three questions.
First, in version three there is layer masking. This feature also exists in version four. This was the only background replacement technology in that version. Nothing has gone missing or changed there. Version 4 offers a AI sky replacement tool which is great for landscape photos.
As far as black-and-white filters go, there is a black and white tool in version four. It, like all tools, supports the use of masking so you can paint in the results or pain to remove them. Nothing has changed here with the ability if you would like to do a selective color edit.
As far as the photos for macOS Extension goes, please make sure you check out the instructions in the user manual. Nothing has changed on the workflow, but you must activate the extension in your system preferences. The tool works as advertised and great with photos for macOS. You could check out these instructions under the help menu in the online user manual.
To expand on Richard’s comment regarding selective color, once you convert an image to monochrome, you can click on the Saturation tab which will reveal a set of color sliders that have been set to “0” (expected since all color is “turned off”). As you move the sliders to the right, you’ll introduce the respective color back into your image.
Or, you could brush and mask as Richard suggested. ;)
Do I need Photoshop or Light-room for this software to work, or can I just use it by itself?
Steven
You don’t need either, Steven – it’s a standalone software that also works with Lightroom and Apple Photos.
In Luminat 4 so many base features are missing. First of all, you can not set a image with in cm or inch and Luminar calculates the resolution (in dpi) based on the pixel count given by the camera.
Second is tha you can not creat a white border araound an image with 2mm width size.
Third missing frature is color management. Priting using ICC Profiles for defined Printer/ink/paper is not possible. Also softproof is not available.
I guess the average user may not need those features, but I agree that there isn’t everything in there at the moment. Let’s see what the next updates offer in 2020…
On the purchase side, will the purchase of a standalone Luminar 4 qualify for updates like the ones you mention?
A second issue is dual display use. This is not available yet in Luminar 4, but supposedly coming. Have you heard if or when that might be? I found it well-implemented in LR but not so much so in ON1 Photo RAW 2019 and later. I hope Skylum does a better job of it.
Hey Harry – updates, yes, but only the incremental ones that happen until the next big update (i.e. when/if Skylum releases a Luminar 5, I expect that will incur a fee, but any of the updates to L4 until then should be free. Re. the dual display, I can’t really comment… but all I can say is that a big update is just around the corner, so let’s keep our fingers crossed they address that.
Hi i was wondering if its possible to download on multiple devices. I have a Windows laptop( core i3, 4 gigs Ram) and will be buying an apple laptop when i can afford it but I’m miss editing my photos and i was wondering if its worth it to buy it for my laptop at the moment and if i will only have to buy the software once.
Hey Mia, Luminar 4 is limited to 2 machines (previous releases were for 5 machines). Sounds like you’ll be fine if you are only concerned about your current laptop and a new one.
Hi Mark
I jumped on the Luminar 4 bandwagon through your affiliate link based on your and others glowing reviews.
Some of the features are indeed very impressive and glitzy, not to mention fun. What all reviews fail to say, including yours, is that features, performance and stability in Windows 10 appear to be a far cry from what Mac users (although you acknowledge it’s not all perfect in Apple world either). For the record I run my copy on an i7 (2017) gaming laptop with large fast ssds and 32gb RAM. I read the promises of development since L3 and would have expected parity at L4 launch. The more I scratch the fun surface, the more issues crop up. Masking tools are effective but basic in Mac version but poor and slow in Windows. Features like the lasso and the ability to join masking points in a straight line through the Shift key for example are sadly missing from the Windows version and have been reportedly worked on since L3. An essential undo for at least the last masking error is essential and missing from both versions. In comments below Skylum promises parity before the end of the year … wait and see but the release of L4 for Windows shouldn’t feel like the beta version it does at launch and if past promises are anything to go by…
Your top recommendation for LR replacement is L4 but, at least in Windows, it’s nowhere near and should come with a warning in that respect. L4 is still a useful plugin for some operation like Sky Replacement or other quick AI adjustments but unfortunately that still tethers me to LR and I’d rather see a C1 seamless plugin rather than the cumbersome return trip I have to implement now. Now running LR, C1, ON1 RAW and L4 as each have some unique strengths but I am still eagerly expecting the precious ring to rule them all.
Thanks for the comment, Igor – apologies for not having tested L4 on Windows 10, since I only had a Mac to review on. I’ll ask the CEO of Skylum to comment on your issues so we can all benefit from his responses. Interested to hear how you’re running all 4 of those image editors in unison! I agree that there’s no one-size-fits-all solution, but I hope you are getting the most from your workflow nevertheless.
Hello Ivan.
This is Alex, Skylum CEO.
First of all, thank you for the comments.
I’d like to have the team do a further research about Luminar performance on your Mac. We have same machines, and Luminar doesn’t perform as you describe. Thanks in advance for contacting me at alex@skylum.com. As for the comments about masking, the vision that we have for Luminar assumes that soon you will not need to do complex masking, as AI will do that for you. Our goal is to bring innovation and new approaches. This is an evolution, and Luminar still has its weaknesses. At the same time it already has a number of great features, that make it a powerful creative tool. The purpose of Luminar is not to replace a Lr, the purpose of Luminar is to make visual art creation accessible to everyone. This is the route we’re taking. Speak soon.
Hi Alex,
Thank you for your prompt response. I am not sure you meant to respond in that way as my name is Igor not Ivan and I do not run a Mac but an MSI GE72 6QD Windows 10 laptop with specs detailed above . All of my comments relate to Windows use and the lack of parity with Mac. No doubt L4 has a number of great features and looks very promising but Windows shouldn’t be an afterthought. Happy to email you details if still interested however. Regards
Can you comment on the Luminar printing console, or lack there of ? I downloaded the trial version and surprisingly it appears there are no advanced printing settings.
Am I missing something ?
Thank you !
Hey John, does this help? https://skylum.com/video-galleries/photography-fundamentals-exclusive-video-series/preparing-photos-for-print
I installed Luminar 4 the day it was launched and it ran fine for about two weeks and then began to crash every so often. Now, every time I launch Luminar 4, it appears to start up and then immediately crashes taking me back to my home screen. My machine is a MacBook Pro and I am running Mojave. I contacted Skylum and sent a copy of the error report generated by my machine but have not had a response. There are many comments/complaints about the same issue on the Luminar Community Bulletin Board. I did keep Luminar 3 and have gone back to using that application but like/liked the advanced features of 4. If you’re using a Mac, I would wait until Skylum identifies this issue and corrects it.
Thanks Steve – here’s the Skylum CEO’s reply on the topic:
“First of all, thanks for downloading Luminar 4. As you’re reading this post, Skylum Product Team is busy working on the next free update. Fixing the reported crashes and issues is our top priority. We will not be able to improve every single bit of it with the next update, but we will put maximum effort to eliminate as many critical issues as possible. Plus, you’ll get new features.
We will keep you posted on when the new version will arrive.”
I used L3 for processing Infrared images using the channel mixer to swap the red and blue channels. This filter has now been removed in L4! I am now looking for alternative software that I can use.
Great review. I purchased the upgrade weeks ago… so when is it finally up and ready to use?
Thanks Jen! November 18th, 2019 :-)
I came here from your youtube review at youtube.com/watch?v=QdsiPWVKd2I because of all the reviews i have seen so far, you are the only one to touch on what has always been the main weakness of Luminar since Luminar Pluto … Filesystem/Workflow stuff.
Unfortunately, you stopped short of answering the key items as you were only concenrned with integration with LR.
Also, the features and Ai stuff are all good but the problems users of Luminar have are with the work flow and not one reviewer considers this as I assume they are not actual users.
So I want to ask here:
1. Has Skylum improved anything in terms of export options in L4 over L3 and have they done anything about long standing requests for improvements?
2. How fast are exports?
3. Do you get an option to export to the same location as the image you are editing as has been requested over the past four years or do you still get whatever folder you last happened to have accessed in Luminar?
4. Have they changed the RAW Rendering engine once again ?
5. Have they added the option to use old rendering engines?
6. It is all well and good running with a test library of 5 or so images but how about 10k images as someone actually relying in this will need? Does it fall over with such a size?
7. Can a user edit 20, 50, 100 images without it choking and failing?
It doesn’t matter what the features do in reality but unless Shylum has fixed the basics, using L4 will still be an exercise in frustration. I have yet to see a review that actually looks into these core issues and hope you can shed some light as you at least scratched the surface.
Good questions, Dayo – most of them are better answered by Skylum, so I’ll ask them to leave a reply. As for the others, I’ll add to the review after using the software more when the official version is released (I was using a pre-release.)
I still have both versions of Luminar 2018 and Luminar 3 on my MacBook Pro. If I upgrade to Luminar 4, should I uninstall the previous versions? Currently, when I take a photo from Lightroom to Luminar it opens the photo in Luminar 2018, which is why I still have both. Honestly I rarely use Luminar 3 version since I usually start in Lightroom.
Hey Diane, if I were you I wouldn’t uninstall anything yet – get Luminar 4 if that’s what you intend to do, then import your folders into it and when you’re happy everything is working fine, you can uninstall Luminar 3 and 2018. Next time you edit a photo in Lightroom and try and continue in Luminar, only Luminar 4 will open. All the best!
Thanks for such a thorough and helpful review, Mark. I bought Luminar 3 but hardly ever used it in the end. However, this sounds like such a big improvement that I think I’ll use it a lot more. I already have it on pre-order.
Sure thing David! I’m glad you found it useful. It’s definitely a bit improvement on version 3. Keep up the great work – I checked out your Flickr shots :-)
After reading your review I was ready to jump on this product to replace LR. But .. then you address the lack of metadata. So maybe you could start your review with this issue for stock photographers.
Hey Irene, the ability to edit the metadata of your photos is coming to both versions of Luminar in early 2020. I’ll update this review when it happens.
Well, this is very important information for me. Not being able to add keywords was my main reason not to buy it. So, if there’s hope for editing metadata I think I’ll buy it.
Thanks for a very thorough and objective review. I have been particularly pleased with the tutorials Skylum follows up with after purchase. While there have been occasional unexplained crashes and anomalies, overall I have been very pleased with Luminar and have enjoyed using it since shortly after it was introduced as a Mac product. I particularly have been pleased with their implementation of their DAM as it integrates with the Mac finder without imposing a separate structure ( as Aperture and iPhoto did.)
Yea that finder integration is great. Glad you enjoyed the review, Andy!
I had trouble with speed after initially getting to Luminar 3.
I changed my Nvidia drivers to their studio driver vs the default game driver that downloads for most of their video cards. Image processing Speed is much better.
https://www.nvidia.com/Download/driverResults.aspx/147971/en-us
Ah great tip, Jeff! Thanks!
Thanks for the straightforward review. Getting back into the photo game after a couple of years away. I too abhor the Adobe pricing scam, plus I have come to pretty much despise Lightroom. I am an old Topaz Labs user but it has no DAM. This just might fill the bill for me. Having asset management plus all of the goodies in one spot would be great.
Also saw the new Sky Replacement feature coming on board this fall. All I can say is, “Doesn’t Skylum know there’s on;y one sun?” A couple of their sample photos were pretty funny. Since I’m the picky type when it comes to light direction etc, I see this maybe working well about 50% of the time.
Kind Regards – Libby
haha I saw the Lunminar 4 announcement, but didn’t see the multiple suns Libby!! The AI Sky feature seems slightly gimmicky to me, but it’s definitely impressive and a move in the right direction with AI. It’s also a clear indication of what plans Skylum has for Luminar in the future…. exciting stuff!
Hi Mark,
in lightroom i can create non destructive so called calibration presets to speed up the work.
The presets will only work on particular settings.
ie. i may create a preset that does +10 exposure and -10 saturation ONLY.
if i create a look in Luminar that does the above, i would have to include the 2 filters and save the look.
Every time I will apply the look to an image, it will reset all the possibly existing settings on that image and replace it with the original with the look applied.
Sounds a bit crap to me?
Needs OpenGl.
My laptop won’t run that.
Hi – Having a hard time rationalizing moving to Luminar when they don’t provide any way to print images. What do you recommend? Best they could offer was saving a tiff file and then printing from an unidentified 3rd party app. This is very frustrating.
Hello Bob,
Currently, Luminar 3 works only with your OS’s standard printing dialog.
You can access it via File > Print.
We do have a more advanced printing dialog in our backlog of requested features though and I will definitely pass your feedback to our developers.
I’ve tried Luminar 3 and there is a lot to like. The ONLY things stopping me from moving from Lightroom is the speed (or lack of). Opening a raw file is very slow and moving an adjustment slider is frustrating as you have to move it a bit, wait to see the effect, move it a bit more…. Likewise the filter take several seconds to apply. Not a problem when editing one photo, but for a couple of hundred? I’m using a laptop with an 8th gen, i7, 8gb ram and a very fast SSD. Lightroom works much faster with instantaneous response to sliders even on my older i5 laptop. If they can speed it up, I’ll buy it.
Hey John, I spoke to Skylum and this is what they had to say: “I am happy to inform you, that all the issues you listed are been addressed in the latest Luminar version which is to be released on June 10, 2019”. I’d recommend you download it after that date and have another try.
I use the Windows version, purchased early this year, in large measure due to your review. I almost requested a refund.
I kept it because, for some photos, the sky AI filter made a huge difference and I was able to use it as a plugin to LR5. Since this means creating and storing a TIFF file it makes for a lot of additional storage needed: original RAW file, DNG file plus a TIFF file, but it has proved workable for me.
The subsequent updates have made it much less awkward to use and less crash prone, but, for a Windows user with older equipment, it is often painfully slow.
It will take a few more improvements before the DAM will allow me to consider a move from LR5. I confess that if there was a recent stand alone LR version available I wouldn’t even consider Luminar as anything but a plugin, but there isn’t, and I travel to places with little or no internet.
Hey Kate, try the latest version after June 10, 2019 – the kinks should be ironed out with the DAM ;-)
I am retired, an advanced amateur not a professional, and I primarily photograph landscapes and nature for my own enjoyment. For years I used Google Picasa for organizing my images and LR 6 for editing only my best ones. Once Google dropped support for Picasa and I switched to shooting RAW, I’ve upgraded to LR Classic and imported everything, but object strenuously to their subscription model. I’m already using Aurora2019 and love it! The latest version of Luminar seems like it could well replace LR for me. If Luminar could import LR’s catalog and keep the existing adjustments it would be an obvious reason to switch. Please keep the improvements coming!
On some days, it makes molasses appear to be as fast as an F1 car speeding down the racetrack. It can be temperamental, restarts my macbook pro, stalls, freezes, crashes. On other days, it’s quite efficient and fast. However, I can’t run any other program whatsoever at the same time.
Indeed: “If Luminar could import LR’s catalog and keep the existing adjustments it would be an obvious reason to switch.” This is tempting as is, but the concerns about speed and stability are a problem.
Have you downloaded a trial, James? The latest update improves on the previous issues a lot.
I just bought the Mac version. I’m a beginner and had a Adobe subscription. Cause of the price difference I switched. First thoughts are mixed. It’s slower than LR. Raw takes forever. Ok my Mac is an 2010 version i7 with 4GB RAM. It will probably take some time to get used to LM. I hope the speed will be adressed in the december upgrade. And looking foreward to file system.
But have you tried the windows version? I bought it for less than $40 (win version) and it lacks significant parity with the mac version. I just requested a refund for that as well as many other issues with it. Go to the Luminar windows forum if you want to find out how win users feel about the latest version.
Sorry you didn’t like the Windows version of Luminar. True, some features are still exclusive to the Mac version but we’re working on bringing the two versions to parity by the end of this year. As for the issues you’ve encountered, our support team would be glad to help you solve them if you’re willing to spend some time on troubleshooting.